RAG Pipeline using SQL Database in Microsoft Fabric
Introduction
This project provides step-by-step guidance for building a Retrieval Augmented Generation (RAG) pipeline to make your data AI-ready using Microsoft.
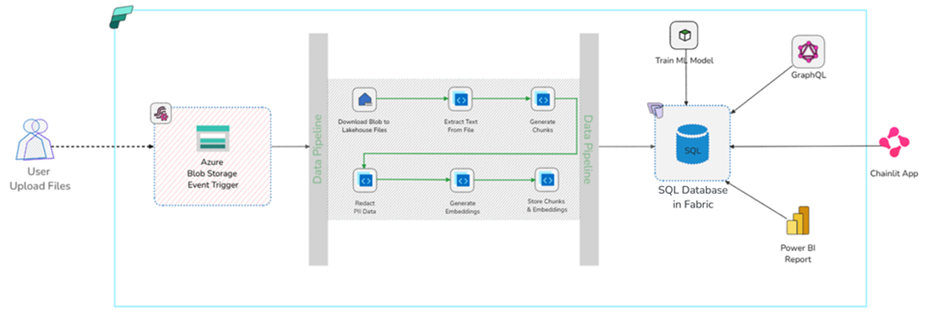
The RAG pipeline is triggered every time a file is uploaded to Azure Blob Storage.
The pipeline processes the file by extracting the textual content, chunking the text, redacting any PII data, generating embeddings, and finally storing the embeddings in a SQL Database in Fabric as a vector store.
The stored content can later be utilized to build AI applications such as recommendation engines, chatbots, smart search, etc
Pre-requisite
This project requires users to bring their own key (BYOK) for AI services, which also means creating these services outside of the Microsoft Fabric platform.
- Download Git and clone the rag-pipeline repository.
- Azure Subscription: Create a free account.
- Microsoft Fabric Subscription: Create a free trial account.
- Azure OpenAI Access: Apply for access in the desired Azure subscription as needed.
- Azure OpenAI Resource: Deploy an embedding model (e.g. text-emebdding-3-small).
- Azure AI multi-service resource, specifically, we will be using Document Intelligence and Azure Language Services from this resource.
- Azure Portal : Create a Storage Account and assign Storage Blob Data Contributor role.
- Optionally, download Azure Storage Explorer to manage the storage account from your desktop.
- Optionally, download Visual Studio Code for free and install Azure Functions Core Tools if you plan to edit User Data Functions using Visual Studio Code.
Dataset
Considering the file formats supported by the Document Intelligence Service, we will utilize the PDF files from Resume Dataset from Kaggle.
Steps
- Create a workspace named IntellegentApp.
- Create a Lakehouse named blob_filestorage.
- Create SQL Database in Fabric named datamart.
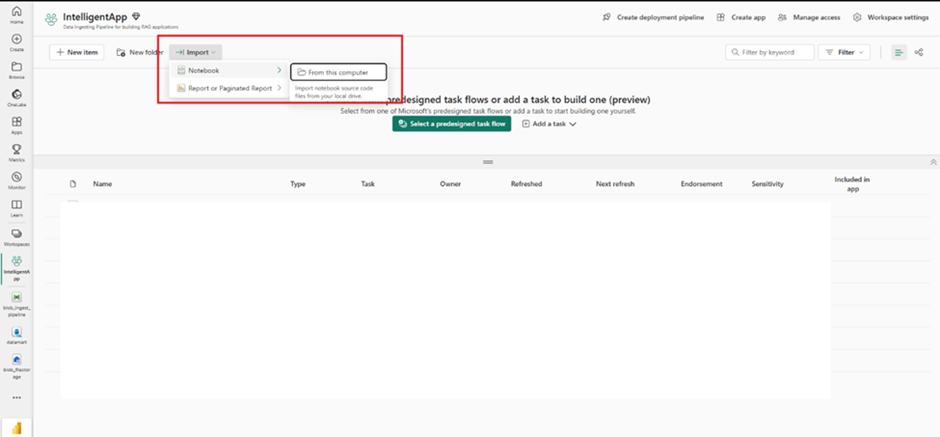
- Navigate to the workspace IntelligentApp, click Import – Notebook – From this computer and then import the notebook cp_azblob_lakehouse.ipynb from the cloned repository’s notebook folder.
5. Attach the Lakehouse blob_filestorage to cp_azblob_lakehouse notebook
-
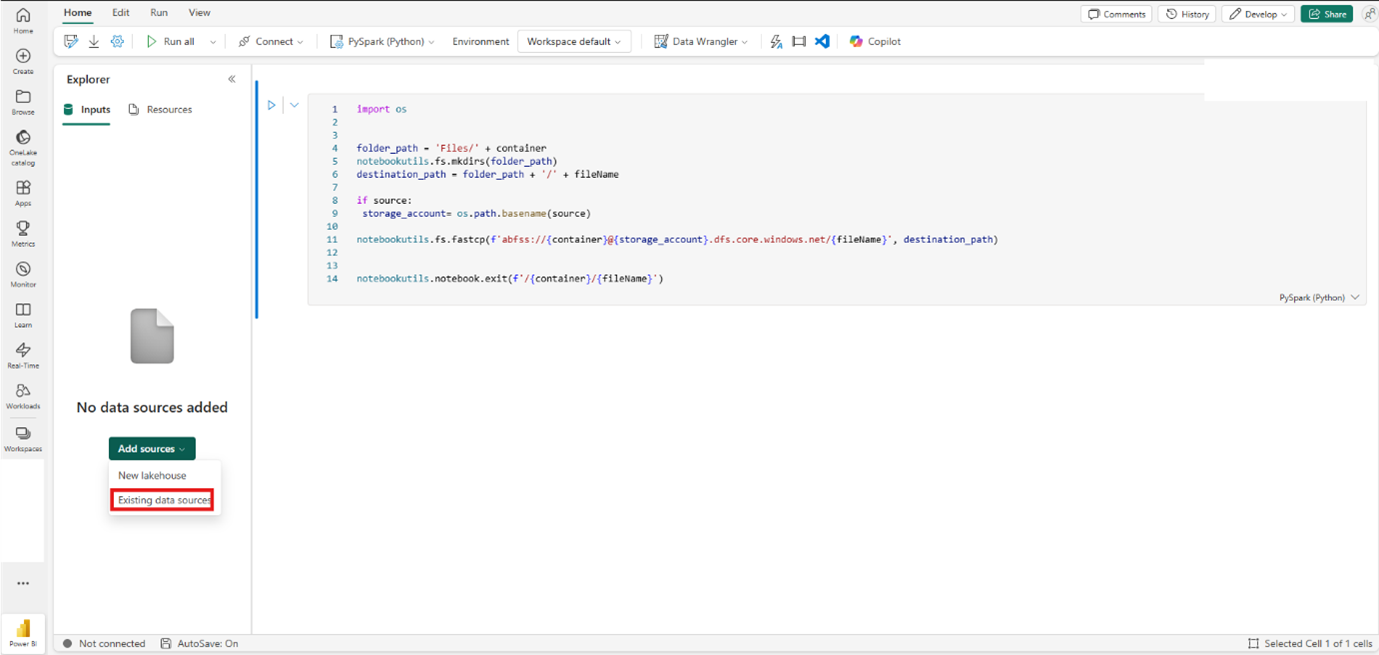
- Open the notebook, on the Explorer click Add sources.
- Select Existing data sources.
Select blob_filestorage from OneLake catalog and then click Connect.
6. Create a User Data Function
-
- Navigate to the IntelligentApp workspace and click +New item
- Search for Function and Select “User data function(s)”.
- Provide the name file_processor.
- Click “New Function”.
- Add Lakehouse and SQL Database as managed connection(s).
- In the Home menu, click Manage Connections and then click “+ Add data connection”.
- From the OneLake catalog select datamart (SQL Database) and then click “Connect”.
- Repeat the previous step to add blob_filestorage (Lakehouse) as a managed connection.
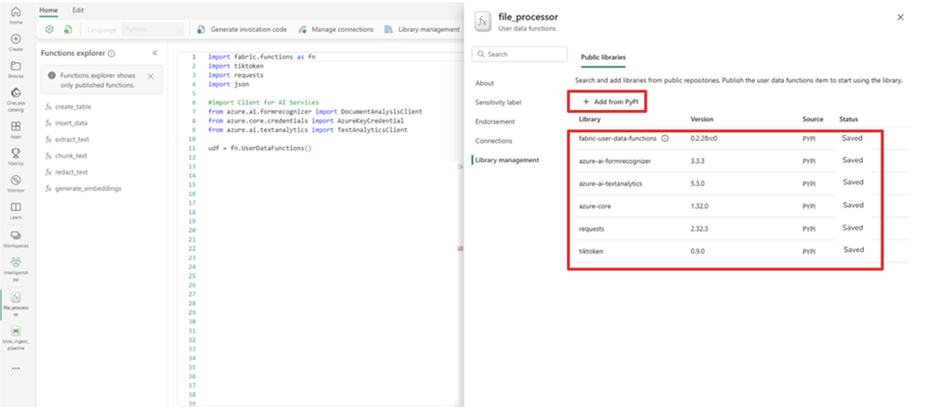
Click Library management, and add the following dependencies (Click “+ Add from PyPI to add the dependencies”).
The dependencies are also listed in /functions/requirements.txt file of the cloned repository.Ensure you are using fabric-user-data-functions version 0.2.28rc0 or higher.
- In the function editor, replace existing content with the contents of function\function_app.py from the cloned repository.
- Click “Publsh”(on the top right) to deploy the function. Once the functions are deployed, click “Refresh”.
7. Create a Data Pipeline by navigating to the workspace and then clicking on “+ New Item”
-
- Search and select “Data Pipeline”.
- Provide the name blob_ingest_pipeline.
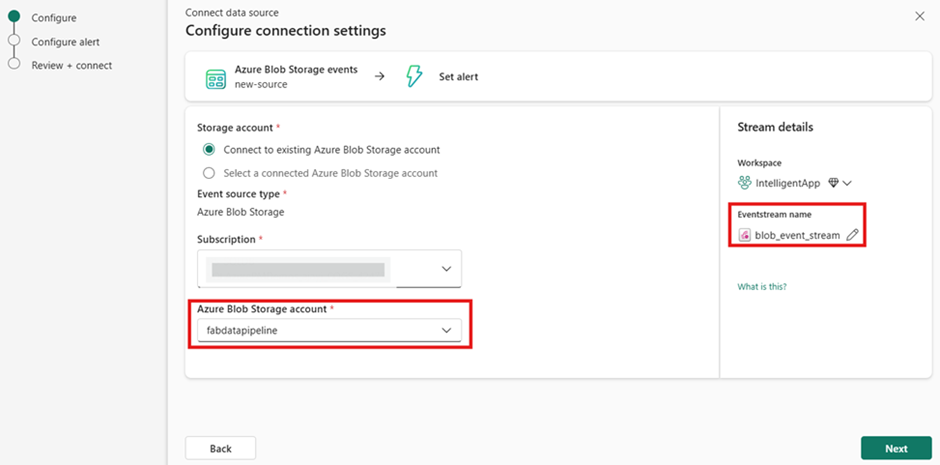
8.Create a Data Pipeline storage trigger by clicking “Add trigger (preview)” button and provide the following configuration :
-
-
- Source: Select Azure Blob Storage events.
- Storage account: Connect to existing Azure Blob Storage account.
- Subscription: Select your Azure subscription.
- Azure Blob Storage account: Select the blob storage account under your subscription.
- Eventstream name: blob_ingest_stream.
-
9. Click “Next”, to configure the event type and source
-
- Event Type(s): Select only the Microsoft.Storage.BlobCreated event. This will ensure that an event is generated each time a new blob object is uploaded.
Click “Next” to review the configuration. Then, click “Connect” to connect to the blob storage. A successful connection will be indicated by the status “Successful”. Finally, click “Save”.
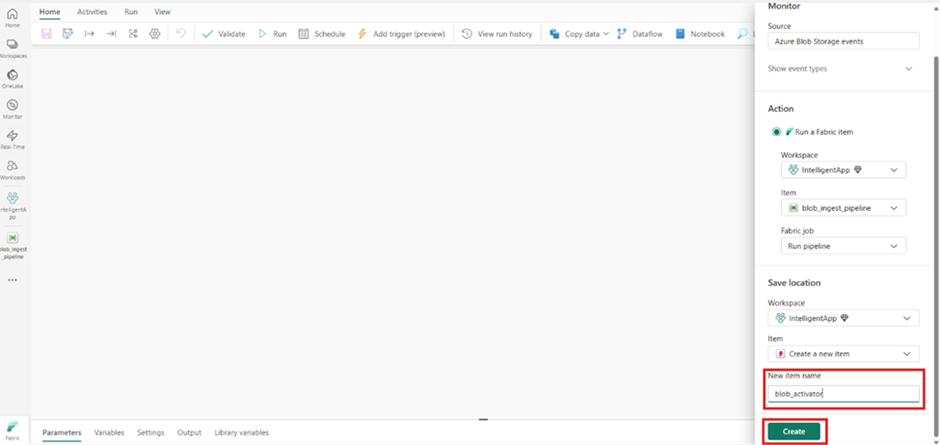
On the Set alert screen, under Save location, configure the following settings,
- Select, Create a new item.
- New item name: blob_activator
- Click “Create” to create and save the alert.
Now that we have setup the stream, it’s time to define the blob_ingest_pipeline.
Pipeline Defination
Pipeline can be defined in two distinct ways as outlined below,
Import Template
Templates offer a quick way to begin building data pipelines. Importing a template brings in all required activities for orchestrating a pipeline.
To import a template,
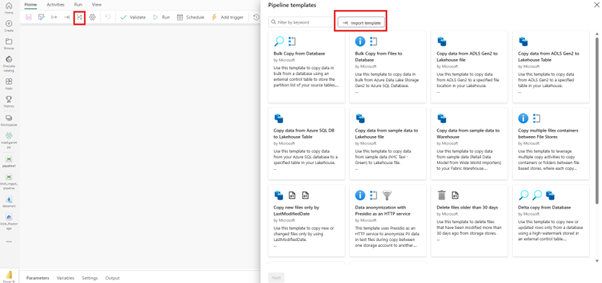
- Navigate to the Home menu of the data pipeline.
- Click, Use a template
- From the Pipeline templates page click Import template.
Import the file template/ AI-Develop RAG pipeline using SQL database in Fabric.zip from the cloned repository.
The imported data pipeline is preloaded with all necessary activities, variables, and connectors required for end-to-end orchestration.
Consequently, there is no need to manually add a variable or an activity.
Instead, you can proceed directly to configuring values for the variables and each activity parameter in the pipeline, as detailed in the Blank Canvas section.
Blank Canvas
- Establish pipeline variables. Click on the pipeline canvas, select the Variablesmenu, and then click “+ New” to add and configure values for the following variables:
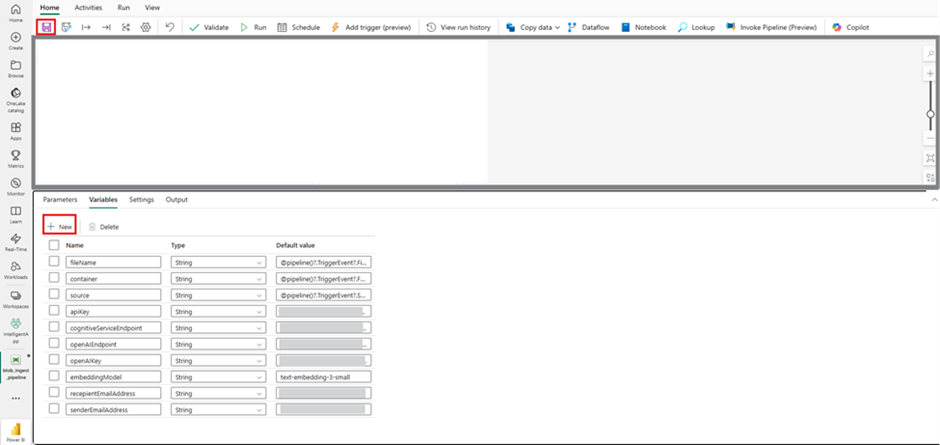
| Name | Type | Value | Comments |
| fileName | String | @pipeline()?.TriggerEvent?.FileName | NA |
| container | String | @pipeline()?.TriggerEvent?.FolderPath | NA |
| source | String | @pipeline()?.TriggerEvent?.Source | NA |
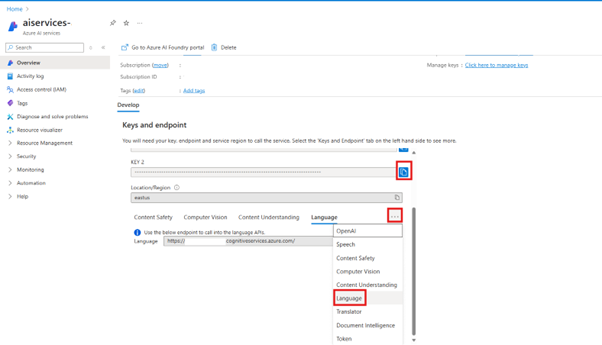
| cognitiveServiceEndpoint | String | https://YOUR-MULTI-SERVICE-ACCOUNT-NAME.cognitiveservices.azure.com/ | Replace YOUR-MULTI-SERVICE-ACCOUNT-NAME with the name of your multi-service account |
| apiKey | String | YOUR-MULTI-SERVICE-ACCOUNT-APIKEY | Replace YOUR-MULTI-SERVICE-ACCOUNT-APIKEY with the apikey of your multi-service account |
| openAIEndpoint | String | https://YOUR-OPENAI-ACCOUNT-NAME.openai.azure.com/ | Replace YOUR-OPENAI-ACCOUNT-NAME with the name of your Azure OpenAI Account |
| openAIKey | String | YOUR-OPENAI-APIKEY | Replace YOUR-OPENAI-APIKEY with the apikey of your Azure OpenAI Account |
| embeddingModel | String | text-embedding-3-small | NA |
| recepientEmailAddress | String | to-email-address | receipeint email address |
| senderEmailAddress | String | from-email-address | sender’s email address |
Add a Notebook Activity
The notebook associated with this activity utilizes NotebookUtils to manage file system.
During the execution of the notebook, a folder corresponding to the container name will be created if it does not exist. Subsequently, the file will be copied from Azure Blob Storage to the Lakehouse folder.
Configure this activity as outlined below:
General Tab
– Name: azureblob_to_lakehouse
Settings Tab,
– Notebook: cp_azblob_lakehouse
Base parameters
Click “+New” to add the following parameters,
Name: fileName
-Type: String
-Value: @variables(‘fileName’)
Name: container
-Type: String
-Value: @variables(‘container’)
Name: source
-Type: String
-Value: @variables(‘source’)
Use On Success connector of the activity to link to the subsequent function (Extract Text) activity.
Add a Functions Activity
The function extract_text associated with this activity uses Azure AI Document Intelligence service to extract the “text” content from the file copied into the Lakehouse by the previous activity.Configure this activity as outlined below :
General Tab,
– Name: Extract Text
Settings Tab,
– Type: Fabric user data functions
– Connection: Sign in (if not already) using your workspace credentials.
– Workspace: IntelligentApp (default selected)
– User data functions: file_processor
– Function: extract_text
Parameters:
Name: filePath
– Type: str
– Value: @activity(‘azureblob_to_lakehouse’).output.result.exitValue
Name: cognitiveServicesEndpoint
– Type: str
-Value: @variables(‘cognitiveServiceEndpoint’)
Name: apiKey
– Type: str
– Value: @variables(‘apiKey’)
Use On Completion connector of the activity to link to the subsequent If Condition (Text Extraction Results) activity.
Add an If Conditions Activity
To verify the success of the text extraction in the previous step.If the extraction was unsuccessful, an email would be sent to the configured recepient and the pipeline would be terminated.Configure this activity as outlined below:
General Tab,
– Name: Text Extraction Results
Activities Tab,
– Expression: @empty(activity(‘Extract Text’).error)
– Case: False. Edit the false condition using the edit (pencil) icon, and add the following activities,
Office 365 Outlook activity
To send alert emails:
General Tab,
– Name: Text Extraction Failure Email Alert
Settings Tab,
– Signed in as: Sign-in (if not already) using your workspace credentials.
– To:@variables(‘recepientEmailAddress’)
– Subject:Text Extraction Error
– Body:<pre>@{replace(string(activity(‘Extract Text’).error.message), ‘\’,”)}</pre>
Advanced,
From: @variables(‘senderEmailAddress’)
Importance: High
Use On Success connector of the activity to link to the subsequent Fail activity.
Fail activity: To terminate the pipeline
General Tab,
– Name: Text Extraction Process Failure
Settings Tab,
– Fail message: @{replace(string(activity(‘Extract Text’).error), ‘\’,”)}
– Error code: @{activity(‘Extract Text’).statuscode}
Return to the main canvas by clicking the pipeline name blob_ingest_pipeline and use the On Success connector of the If Condition activity to link to the subsequent Function (Generate Chunks) activity.
Add a Functions Activity
The function chunk_text associated with this activity uses tiktoken tokenizer to “generate chunks” for the text extracted by the previous activity.
Configure this activity as outlined below :
General Tab,
– Name: Generate Chunks
Settings Tab,
Type: Fabric user data functions
– Connection: : Sign-in (if not already) using your workspace credentials.
– Workspace: IntelligentApp (default selecteed)
– User data functions: file_processor
– Function: chunk_text
Parameters:
Name: text_
– Type: str
– Value: @activity(‘Extract Text’).output.output
Name: maxToken
– Type: int
– Value: 500
Name: encoding
– Type: str
– Value: cl100k_base
Use the On Success connector of the activity to link to the subsequent Function (Redact PII Data) activity.
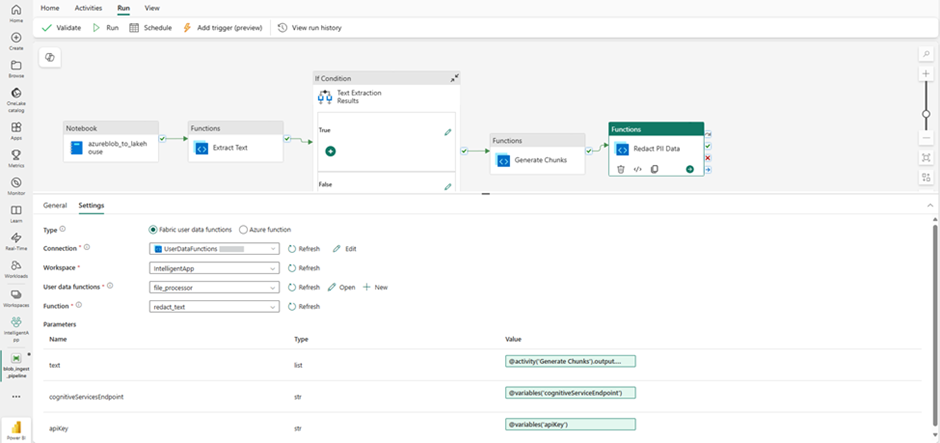
Add a Functions activity
The function redact_textassociated with this activity uses Azure AI Language service to “Redact PII Data” for the chunks generated by the preceding activity. The chunking of text is done prior to redaction to comply with the service limits requirements for the PII detection feature.
Configure this activity as outlined below :
General Tab,
– Name: Redact PII Data
Settings Tab,
– Type: Fabric user data functions
– Connection: Sign in (if not already) using your workspace credentials.
– Workspace: IntelligentApp (default selected)
– User data functions: file_processor
– Function: redact_text
Parameters:
Name: text
– Type: list
– Value: @activity(‘Generate Chunks’).output.output
Name: cognitiveServicesEndpoint
– Type: str
– Value: @variables(‘cognitiveServiceEndpoint’)
Name: apiKey
– Type: str
– Value: @variables(‘apiKey’)
Use On Completion connector of the activity to link to the subsequent If Condition (PII Redaction Results) activity.
Add an If Conditions Activity
To verify the success of the PII redaction in the previous step. If the redaction was unsuccessful, an email would be sent to the configured recipient, and the pipeline would be terminated.Configure this activity as outlined below:
General Tab,
– Name: PII Reaction Results
Activities Tab,
– Expression: @empty(activity(‘Redact PII Data’).error)
– Case: False. Edit the false condition using the edit (pencil) icon, and add the following activities,
Office 365 Outlook activity: To send alert emails.
General Tab,
– Name: Redaction Failure Email Alert
Settings Tab,
– Signed in as: Sign-in (if not already) using your workspace credentials.
– To:@variables(‘recepientEmailAddress’)
– Subject: Text Extraction Error
– Body:<pre>@{replace(string(activity(‘Redact PII Data’).error.message), ‘\’,”)}</pre>
Advanced,
– From: @variables(‘senderEmailAddress’)
– Importance: High
Use On Success connector of the activity to link to the subsequent Fail activity.
Fail activity: To terminate the pipeline
General Tab,
– Name: Text Extraction Process Failure
Settings Tab,
– Fail message: @{replace(string(activity(‘Redact PII Data’).error), ‘\’,”)}
– Error code: @{activity(‘Redact PII Data’).statuscode}
Return to the main canvas by clicking the pipeline name blob_ingest_pipeline and use the On Success connector of the If Condition activity to link to the subsequent Function (Generate Embeddings) activity.
Add a Functions Activity
The function generate_embeddingsassociated with this activity uses Azure Open AI Service embedding model to convert the redacted chunks into embeddings.Configure this activity as outlined below :
General Tab,
– Name: Generate Embeddings
Settings Tab,
– Type: Fabric user data functions
– Connection: : Sign-in (if not already) using your workspace credentials.
– Workspace: IntelligentApp (default selecteed)
– User data functions: file_processor
– Function: generate_embeddings
Parameters:
Name: text
– Type: list
– Value: @activity(‘Redact PII Data’).output.output
Name: openAIServiceEndpoint
– Type: str
– Value: @variables(‘openAIEndpoint’)
Name: embeddingModel
– Type: str
– Value: @variables(’embeddingModel’)
Name: openAIKey
– Type: str
– Value: @variables(‘openAIKey’)
Name: fileName
– Type: str
– Value: @variables(‘fileName’)
Use On Completion connector of the activity to link to the subsequent If Condition (Generate Embeddings Results) activity.
Add an If Conditions Activity
Activity to verify the success of the Generate Embeddings in the previous step. If the embeddings generation were unsuccessful, an email would be sent to the configured recipient, and the pipeline would be terminated.Configure this activity as outlined below:
General Tab,
– Name: Generate Embeddings Results
Activities Tab,
– Expression: @empty(activity(‘Generate Embeddings’).error)
– Case: False. Edit the false condition using the edit (pencil) icon, and add the following activities,
Office 365 Outlook activity: To send alert emails.
General Tab,
– Name: Generate Embeddings Failure Email Alert
Settings Tab,
– Signed in as: Sign-in (if not already) using your workspace credentials.
– To:@variables(‘recepientEmailAddress’)
– Subject:Generate Embeddings Error
– Body:<pre>@{replace(string(activity(‘Generate Embeddings’).error.message), ‘\’,”)}</pre>
Advanced,
– From: @variables(‘senderEmailAddress’)
– Importance: High
Use On Success connector of the activity to link to the subsequent Fail activity.
Fail activity: To terminate the pipeline
General Tab,
– Name: Text Extraction Process Failure
Settings Tab,
– Fail message: @{replace(string(activity(‘Generate Embeddings’).error), ‘\’,”)}
– Error code: @{activity(‘Generate Embeddings’).statuscode}
Return to the main canvas by clicking the pipeline name blob_ingest_pipeline and use the On Success connector of the If Condition activity to link to the subsequent Function (Create Database Objects) activity.
Add a Functions activity
The function create_tableassociated with this activity executes a SQL command to create a documents table within the previously created datamart, SQL Database.Configure this activity as outlined below :
General Tab,
– Name: Create Database Objects
Settings Tab,
– Type: Fabric user data functions
– Connection: : Sign-in (if not already) using your workspace credentials.
– Workspace: IntelligentApp (default selecteed)
– User data functions: file_processor
– Function: create_table
Use On Success connector of the activity to link to the subsequent If Condition (Generate Embeddings Results) activity.
Add a Functions activity
The function “insert_data” associated with this activity executes a SQL command to bulk insert rows in the documents table created in the previous activity.
Configure this activity as outlined below :
General Tab,
– Name: Save Data
Settings Tab,
– Type: Fabric user data functions
– Connection: Sign-in (if not already) using your workspace credentials.
– Workspace: IntelligentApp (default selected)
– User data functions: file_processor
– Function: insert_data
Parameters:
Name: data
– Type: list
– Value: @activity(‘Generate Embeddings’).output.output
Troubleshooting
- When adding a Python library from PyPI to User Data Functions, you might notice an error, such as a wiggly line under the library name (e.g., azure-ai-textanalytics), like a spelling mistake.
Users should ensure the library name is spelled correctly and then ignore the error by tabbing out to the Version dropdown and selecting the correct version. This transient error should resolve itself. - The imported pipeline reportedly doesn’t seem to preload with the parameter values.
For each activity in the pipeline, ensure that the parameter values are provided and correct. Refer to the Blank Canvas section for the required parameters and their values.
Execute Pipeline (Pipeline in Action)
Let’s put everything we have done so far into perspective and see the pipeline in action.
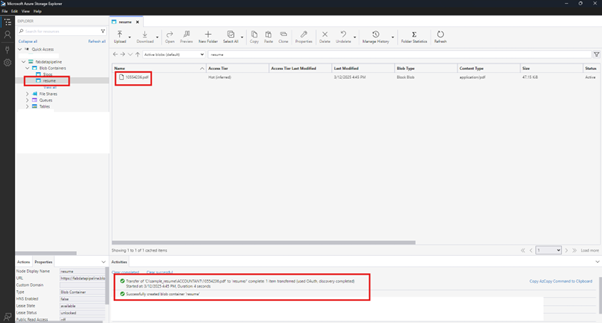
Upload a PDF
- Use the Azure Storage Explorer or alternatively Azure Portal and create a Blob container named resume.
- Upload a PDF file from the Kaggle dataset.
Pipeline execution review
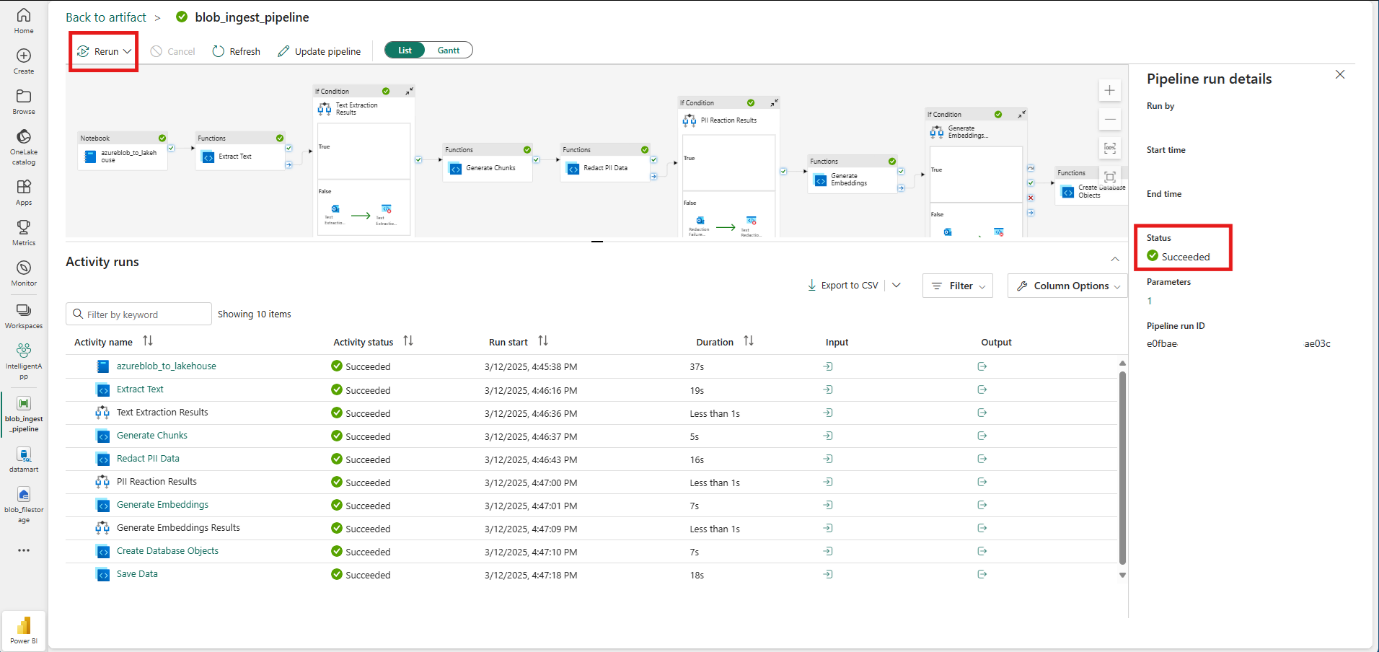
- From the pipeline’s “Run” menu, select View run history and select the recent pipeline run.
- In the details view, check to see if the status is Succeeded
- In case of a Failure, try to Rerun the pipeline using the rerun option.
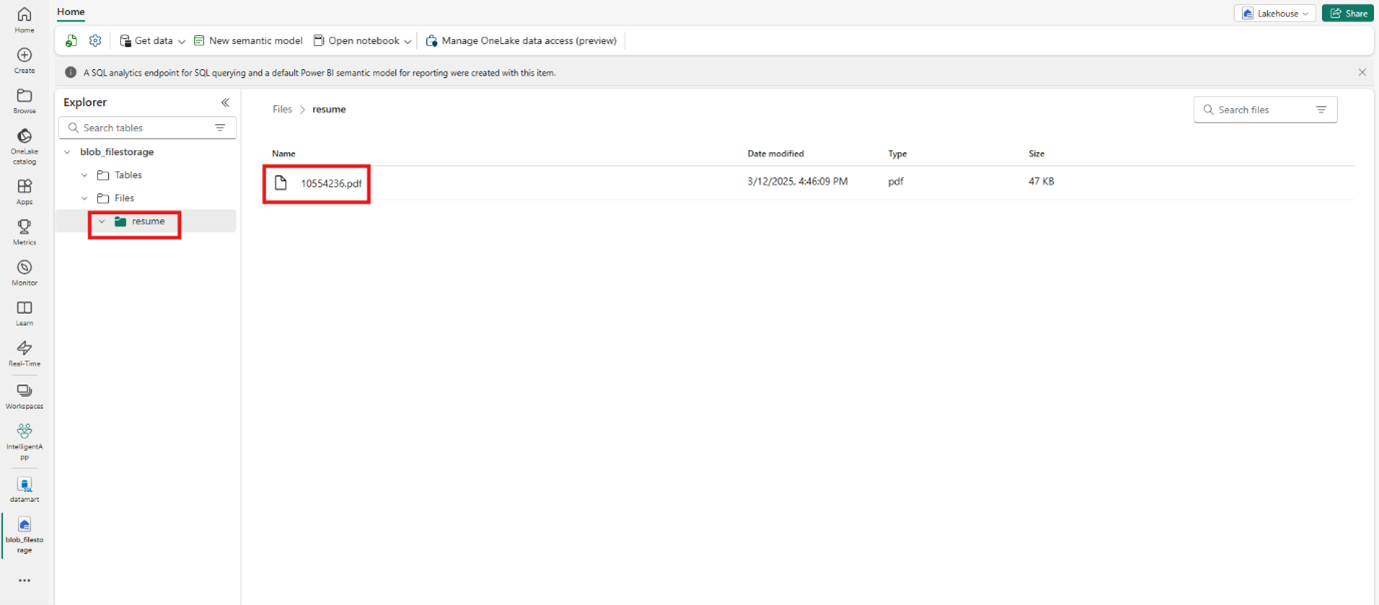
Review Lakehouse
- A folder with the same name as that of the container (resume) is created.
- The PDF file is copied from Azure Blob Storage to the Lakehouse files.
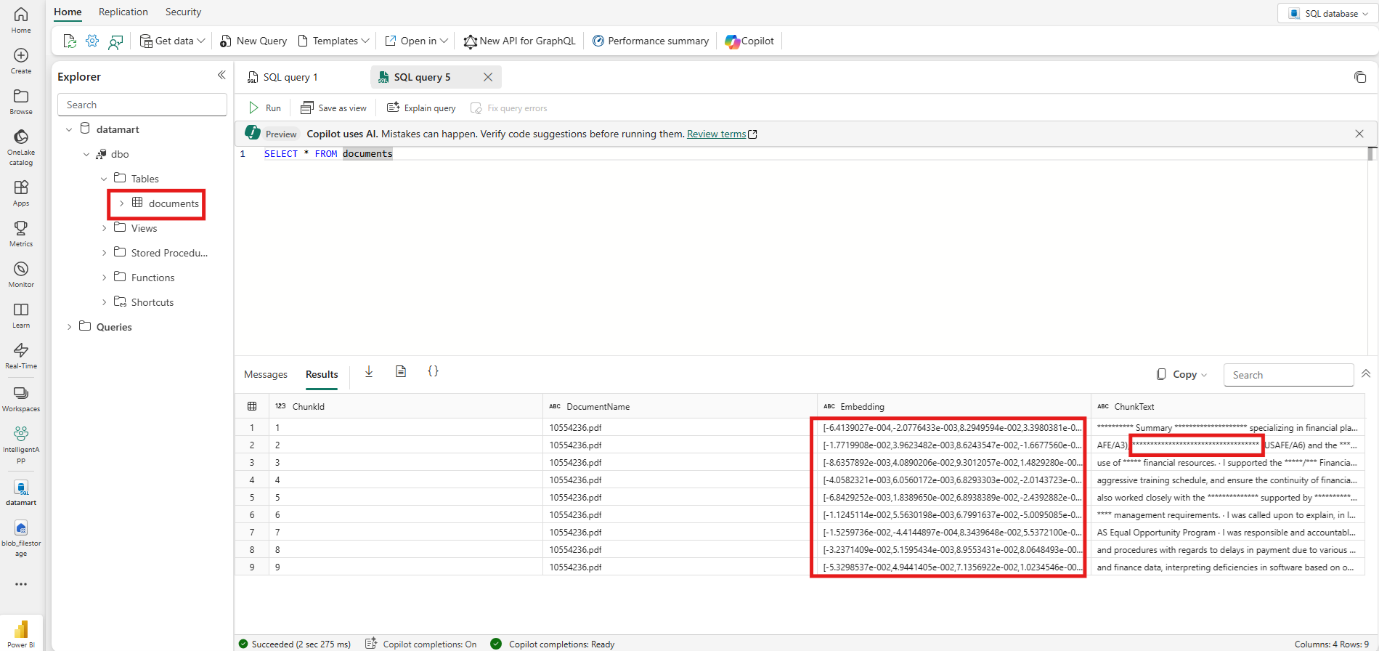
Review Database
- The document table should be automatically created by the pipeline.
- Redacted chunk data and the embeddings stored in the documents table.
Conclusion: Bridging Your Data to Intelligence
You’ve now successfully constructed a robust, end-to-end RAG pipeline, transforming your raw documents into a valuable, AI-ready vector store right inside Microsoft Fabric. Let’s recap what this powerful architecture unlocks for you.
What You’ve Accomplished:
- Full Automation: An event-driven trigger on Azure Blob Storage kicks off a hands-free process.
- Intelligent Processing: You’ve integrated best-in-class Azure AI services for text extraction, PII redaction, and embedding generation.
- A Unified Vector Store: Your Fabric SQL Database now serves as a secure and scalable home for your vector embeddings, ready for any AI application.
Blog Author

Quazi Syed
Data Engineer
Intellify Solutions
